Managing your business assets in Meta Business Manager (https://business.facebook.com/) is essential for collaboration and scaling your marketing efforts. Whether you’re onboarding a new team member or a partner agency, giving the right access ensures everyone can work efficiently without compromising security.
In this guide, you’ll learn how to:
Add people to your Meta Business
Add partners to your Business Manager
Give Full Access to Facebook Page, Instagram Account, WhatsApp, and Meta Ad Accounts
Log in using the Facebook account linked to your Business Manager.
You’ll land on the Meta Business Suite Dashboard.
2. Navigate to Business Settings
From the left-hand menu, click Business Settings (A gear or settings icon)
This is the control center for users, partners, assets, and permissions.
3. Add People (Team Members)
Adding people lets your team access business assets like Pages, Ad Accounts, and Instagram.
In Business Settings, click Users → People
Click Add
Enter the email address of the person you want to add.
Choose the role:
Employee Access – limited permissions
Admin Access – full control over business assets
For full access, select Admin Access
5. Click Next
4. Assign Assets & Permissions to People
Once you’ve added someone, assign assets with full access permissions:
Facebook Page
Under the person’s name, select Pages
Click Assign
Select the Page(s) you want to give access to
Turn on Full Control
Click Save
Instagram Account
Still in the person’s profile, select Instagram Accounts
Click Assign
Choose the Instagram account you want
Set Full Access
Click Save
WhatsApp
In Business Settings → Accounts → WhatsApp Accounts
Click Add
Choose the WhatsApp Business account
Click Assign Partners or People
Choose the person → toggle Full Access
Save
Ad Accounts
Select Ad Accounts (Under Accounts in Business Settings)
Click Assign
Choose the Ad Account
Choose Full Control
Save
5. Adding Partners (Agencies / Third Parties)
If you’re working with an external partner or agency, instead of adding an individual email, you grant access via Partner Business ID.
In Business Settings, click Users → Partners
Click Add
Enter your partner’s Business ID (Your agency provides this)
Click Next
Assign the assets (Page, Instagram, Ad Account, WhatsApp) and give Full Access
Click Save
6. Confirm Access & Test Permissions
Great! Now that the roles and assets are assigned, make sure everything works:
✔ Ask the person/partner to log in ✔ Confirm they can access:
Facebook Page inbox and settings
Meta Ads Manager
Instagram account features in Business Suite
WhatsApp messaging & settings
Best Practices When Assigning Access
🔹 Only assign full access when necessary 🔹 Use roles that match the person’s responsibilities 🔹 Remove access immediately if someone leaves your team 🔹 Review access once a quarter to keep things secure
Wrapping Up
Adding people and partners in Meta Business Manager and granting full access to Facebook, Instagram, WhatsApp, and Ad Accounts is essential for collaboration and scaling your marketing.
By following this step-by-step process, you’ll be able to:
✔ Invite team members ✔ Assign roles and assets ✔ Give full control securely ✔ Collaborate with partners and agencies
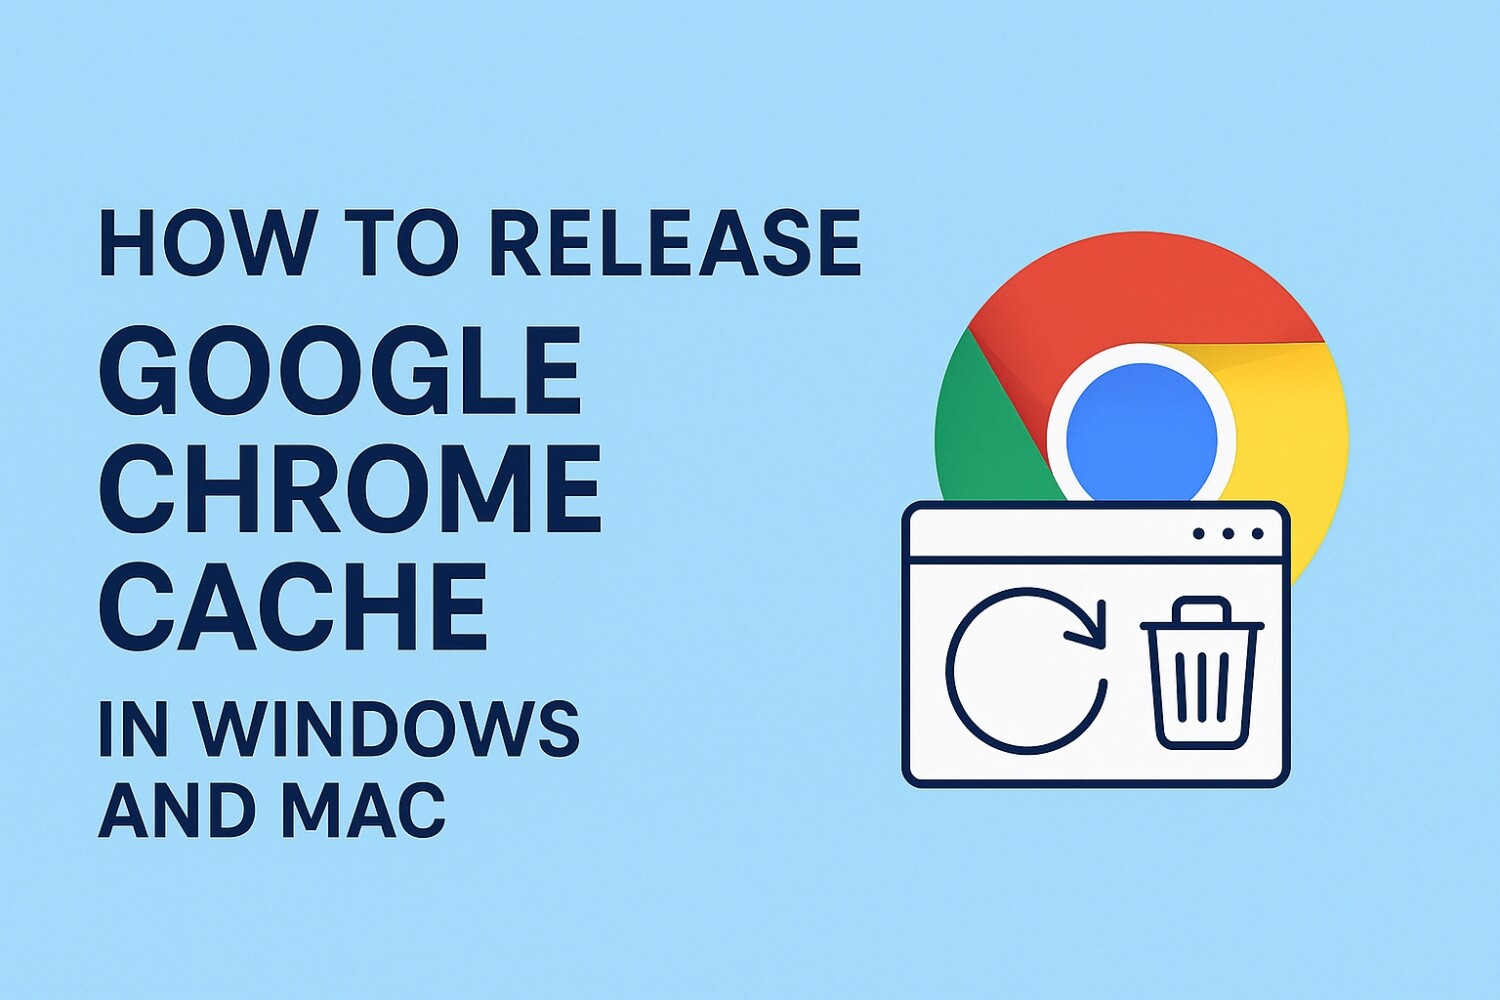
Clearing your browser’s cache can help resolve loading issues, improve performance, and ensure you’re viewing the most up-to-date content on a website. This guide explains how to release Google Chrome’s cache on both Windows and Mac platforms using simple, step-by-step instructions.
What is Browser Cache?
The browser cache stores copies of web pages, images, and other content locally on your device for quicker access. Over time, this cached data can become outdated or corrupted, leading to website loading errors or lag.
Regularly clearing your Google Chrome cache can help avoid performance issues and ensure a smoother browsing experience. Whether you’re using Windows or Mac, the process is straightforward and fast. Keep this guide handy for the next time you experience a slow-loading site or visual glitch in Chrome.
The Benefits of Artificial Intelligence (I.A) for the Real Estate Market
Artificial intelligence (AI) is transforming industries across the board, and the real estate market is no exception. With the ability to analyze vast amounts of data and make predictions based on that data, AI is revolutionizing the way real estate professionals do business. In this article, we’ll explore some of the benefits of AI for the real estate market.
More Accurate Property Valuations
One of the most significant benefits of AI in real estate is its ability to provide more accurate property valuations. Traditionally, property valuations have been done by human appraisers who rely on comparable sales data to determine the value of a property. However, AI algorithms can analyze a much larger dataset, including market trends, property features, and location data, to provide more accurate valuations.
Faster Property Searches
AI-powered property search engines can analyze a buyer’s preferences and match them with suitable properties in a matter of seconds. This saves real estate agents and buyers time and effort in finding the right properties, and ensures that buyers are presented with the most relevant options.
Improved Customer Service
AI-powered chatbots and virtual assistants can provide round-the-clock customer service to potential buyers and sellers. This allows real estate agents to focus on other aspects of their work, while ensuring that customers can get their questions answered at any time of day.
Predictive Analytics
AI algorithms can analyze market trends, consumer behavior, and other data to provide real estate professionals with predictive analytics. This can help agents to identify emerging trends and adjust their strategies accordingly, as well as to anticipate changes in the market.
Personalized Marketing
AI algorithms can analyze data on a potential buyer’s behavior, preferences, and past purchases to provide personalized marketing recommendations. This can help real estate agents to create more effective marketing campaigns that are tailored to the specific needs and interests of their target audience.
Improved Property Management
AI can also be used to improve property management, by providing real-time monitoring of maintenance issues, energy usage, and other aspects of property management. This can help property managers to identify potential issues before they become major problems, and to optimize energy usage to reduce costs and improve efficiency.
In conclusion, AI is transforming the real estate market in numerous ways, from more accurate property valuations to faster property searches and improved customer service. As AI technology continues to evolve, we can expect to see even more innovations in the real estate industry, making it easier and more efficient for buyers, sellers, and agents alike.
Let me know if you have any other questions or if there’s anything else I can help you with!
Learn how to manage social media effectively with our expert tips. Create a content strategy, know your audience, use social media management tools, and monitor data to optimize your social media presence. Boost your online presence and achieve your marketing goals.
Social media management can be a daunting task, especially for businesses that are just starting. Here are some tips for managing social media effectively:
Set Goals and Objectives
Before starting, businesses should set clear goals and objectives for their social media presence. This will help them focus their efforts and measure their success.
Know Your Audience
Businesses should have a clear understanding of their target audience’s behavior, preferences, and interests. This will help them create relevant and engaging content that resonates with their audience.
Create a Content Strategy
Businesses should create a content strategy that outlines the type of content they will create, how often they will post, and on which platforms. This will help them stay consistent and maintain a well-managed social media presence.
Use Social Media Management Tools
There are several social media management tools available that can help businesses manage their social media presence effectively. These tools can help with scheduling posts, analyzing data, and engaging with the audience.
Monitor and Analyze Data
Businesses should regularly monitor and analyze their social media data to make informed decisions and optimize their social media strategy. This will help them identify what works and what doesn’t and make necessary adjustments.
In conclusion, social media management is a crucial aspect of digital marketing, and businesses must have a well-managed and optimized social media presence. By following the tips mentioned above and leveraging the right tools, businesses can effectively manage their social media presence and achieve their marketing and branding goals.
Social media has revolutionized the way we communicate and interact with each other. With billions of people using social media platforms like Facebook, Twitter, Instagram, LinkedIn, and more, it has become a vital tool for businesses to reach out to their target audience and promote their brand.
However, with the ever-increasing competition on social media, it has become crucial for businesses to have a well-managed and well-optimized social media presence. This is where social media management comes into play.
Social media has become a crucial aspect of digital marketing and is an essential tool for businesses to reach out to their target audience. Here are some reasons why social media management is essential for businesses:
Increase Brand Awareness
Social media is an excellent platform for businesses to promote their brand and increase brand awareness. By creating relevant and engaging content, businesses can attract new customers and build a loyal following.
Social media is an excellent tool to drive traffic to the website. By promoting blog posts and other content on social media platforms, businesses can attract new visitors to their website, increasing their chances of generating leads and conversions.
Build Brand Loyalty
Social media is a great platform to engage with the audience and build brand loyalty. By responding to comments and messages, businesses can establish a relationship with their customers, increasing their chances of retaining them.
Gain Insights into the Audience
Social media analytics provides businesses with insights into their audience’s behavior, preferences, and interests. By analyzing these insights, businesses can make informed decisions and optimize their social media strategy to better reach their target audience.
Increase Conversions
Social media is an excellent tool to increase conversions. By promoting products and services on social media platforms, businesses can reach out to their target audience and increase their chances of converting them into customers.
Search engine optimization (SEO) is a crucial element of any digital marketing strategy. With the constant evolution of search engine algorithms, it is imperative to stay updated with the latest SEO best practices to rank higher in search results and attract more organic traffic. In this blog post, we will discuss the top SEO best practices that every business should implement to improve their search engine rankings.
Conduct keyword research
Keyword research is the foundation of any successful SEO strategy. It involves researching and identifying the keywords and phrases that your target audience is searching for. By optimizing your content with these keywords, you can improve your chances of ranking higher in search results. There are various keyword research tools available, such as Google Keyword Planner, SEMrush, and Ahrefs, that can help you identify the most relevant keywords for your business.
Optimize your website structure
A well-organized website structure makes it easier for search engines to crawl and index your website. The website should have a clear hierarchy of pages, with the most important pages linked from the homepage. The URL structure should be simple and easy to read, with relevant keywords included in the URL. Additionally, it is essential to optimize your website’s metadata, including the page titles, meta descriptions, and header tags, to ensure they are relevant to the content on the page.
Create high-quality, engaging content
Creating high-quality content is critical for both user engagement and SEO. Search engines favor websites that offer valuable and relevant content to their users. Make sure your content is well-written, informative, and engaging, and includes the relevant keywords. Additionally, using multimedia elements such as images, videos, and infographics can help improve user engagement and increase the time users spend on your website.
Build high-quality backlinks
Backlinks are links from other websites that point to your website. Search engines view backlinks as a vote of confidence in your website’s credibility and authority. Building high-quality backlinks from authoritative websites can significantly improve your search engine rankings. However, it is important to note that not all backlinks are created equal. Focus on building high-quality backlinks from relevant websites in your industry, as this will have a more significant impact on your rankings.
Ensure your website is mobile-friendly
With the majority of internet users accessing websites through mobile devices, it is essential to ensure your website is mobile-friendly. A mobile-friendly website is optimized for smaller screens, has fast load times, and provides an excellent user experience. Search engines now prioritize mobile-friendly websites in their search results, so it is critical to ensure your website is optimized for mobile devices.
Monitor and analyze your website’s performance
Monitoring and analyzing your website’s performance is crucial to ensure your SEO strategy is working effectively. Use tools such as Google Analytics and Google Search Console to track your website’s traffic, rankings, and user behavior. This information can help you identify areas where your website needs improvement and adjust your Search engine optimization SEO strategy accordingly.
In conclusion, implementing these best practices will help improve your search engine rankings and attract more organic traffic to your website. However, Search engine optimization SEO is a long-term strategy that requires ongoing monitoring and adjustments. By staying up to date with the latest SEO trends and best practices, you can ensure your website stays ahead of the competition and ranks higher in search results.
Things to Consider When Hiring a Rebranding Agency for Your Business
Are you considering rebranding your business? Rebranding can be an exciting and necessary step for a company’s growth and success.
However, it can also be a daunting and overwhelming process. That’s why it’s important to hire a professional rebranding agency to help you through the process. Here are some things to consider when hiring a rebranding agency for your business:
Experience and Expertise
When hiring a rebranding agency, it’s important to consider their experience and expertise. Look for an agency that has a proven track record of successful rebranding projects. You want an agency that has the knowledge, skills, and creativity to help you create a strong and memorable brand identity.
Communication and Collaboration
Communication is key to any successful rebranding project. You want to hire an agency that values your input and collaborates with you throughout the process. Make sure they have a clear process for communication and regular check-ins to ensure the project stays on track.
Budget and Timeline
Rebranding can be a significant investment for a business, so it’s important to have a clear understanding of the budget and timeline. Discuss your budget and timeline with the agency upfront to ensure that they can work within your constraints. Be wary of agencies that promise quick and cheap rebranding solutions as they may not provide the quality and attention to detail that your business deserves.
Portfolio and References
When hiring a rebranding agency, take a close look at their portfolio and references. Look for examples of their previous work and make sure it aligns with your vision and goals. Ask for references and reach out to their previous clients to get a better understanding of their experience working with the agency.
Cultural Fit
Rebranding is not just about creating a new logo or design. It’s about creating a brand identity that aligns with your values, mission, and vision. That’s why it’s important to find an agency that fits well with your company culture and values. Look for an agency that shares your passion and understands your brand personality.
In conclusion, rebranding can be a challenging but rewarding process for your business. Hiring a professional rebranding agency can help you navigate the process and create a strong and memorable brand identity. By considering the above factors, you can find an agency that will help you achieve your rebranding goals and take your business to the next level.
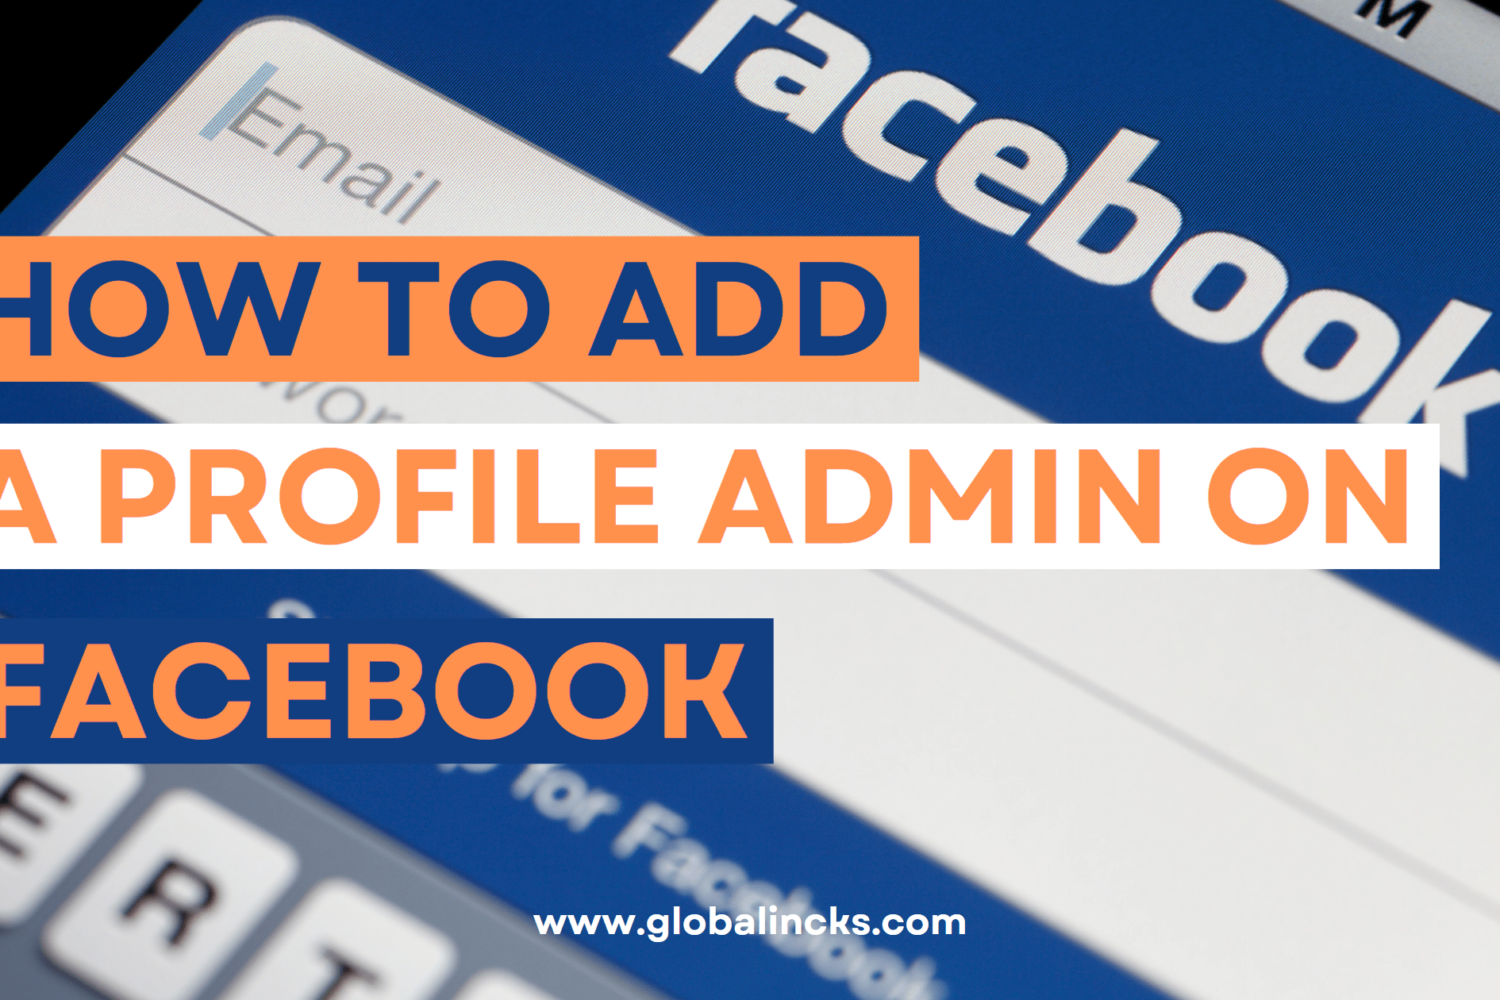
Facebook Meta is a popular social media platform used by millions of people worldwide. It offers businesses a great opportunity to connect with their customers and promote their brand. As a business owner, you may want to add an admin to your Facebook Meta Business page to help you manage it more efficiently. In this blog post, we will guide you through the steps to add an admin to your Facebook Meta Business page.
Step 1: Go to your Facebook Meta Business page First, you need to log in to your Facebook account and go to your Facebook Meta Business page. If you have multiple pages, select the page you want to add an admin to from the list of pages on the left-hand side of the screen.
Step 2: Click on ‘Settings’ Once you are on your Facebook Meta Business page, click on the ‘Settings’ option located at the top right-hand corner of the screen.
Step 3: Click on ‘Page Roles’ From the settings menu, select ‘Page Roles’ located on the left-hand side of the screen.
Step 4: Add an admin In the ‘Page Roles’ menu, you can see a list of people who already have roles on your Facebook Meta Business page. To add a new admin, type in the name or email address of the person you want to add in the ‘Assign a new Page role’ box.
Step 5: Choose a role Once you have added the person, choose the role you want to assign them from the dropdown menu. There are different roles you can choose from, including admin, editor, moderator, advertiser, and analyst.
Step 6: Click ‘Add’ After choosing the role, click the ‘Add’ button to add the new admin to your Facebook Meta Business page. The new admin will receive a notification that they have been added to your page.
Step 7: Confirm the new admin After the new admin accepts your invitation, go back to the ‘Page Roles’ menu, and confirm the new admin by clicking on the ‘Confirm’ button next to their name.
In conclusion, adding an admin to your Facebook Meta Business page is a straightforward process that can be done in a few simple steps. By adding an admin, you can share the responsibility of managing your page and make it easier to keep your audience engaged. Just remember to choose a trustworthy person and assign them a role that fits their skills and responsibilities.
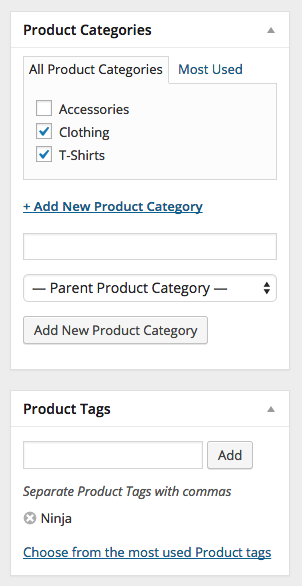
Before adding your first product, let’s get familiar with how product categories, tags, and attributes work.
Product Categories
Product categories and tags work in much the same way as normal categories and tags you have when writing posts in WordPress. They can be created, edited, and selected at any time. This can be done when you first create a product or come back and edit it or the category/tag specifically.
Attributes
These can be added per product, or you can set up global attributes for the entire store to use (e.g., in layered navigation).
Product Types
With attributes and categories set up and stock management configured, we can begin adding products. When adding a product, the first thing to decide is what type of product it is.
Simple – covers the vast majority of any products you may sell. Simple products are shipped and have no options. For example, a book.
Grouped – a collection of related products that can be purchased individually and only consist of simple products. For example, a set of six drinking glasses.
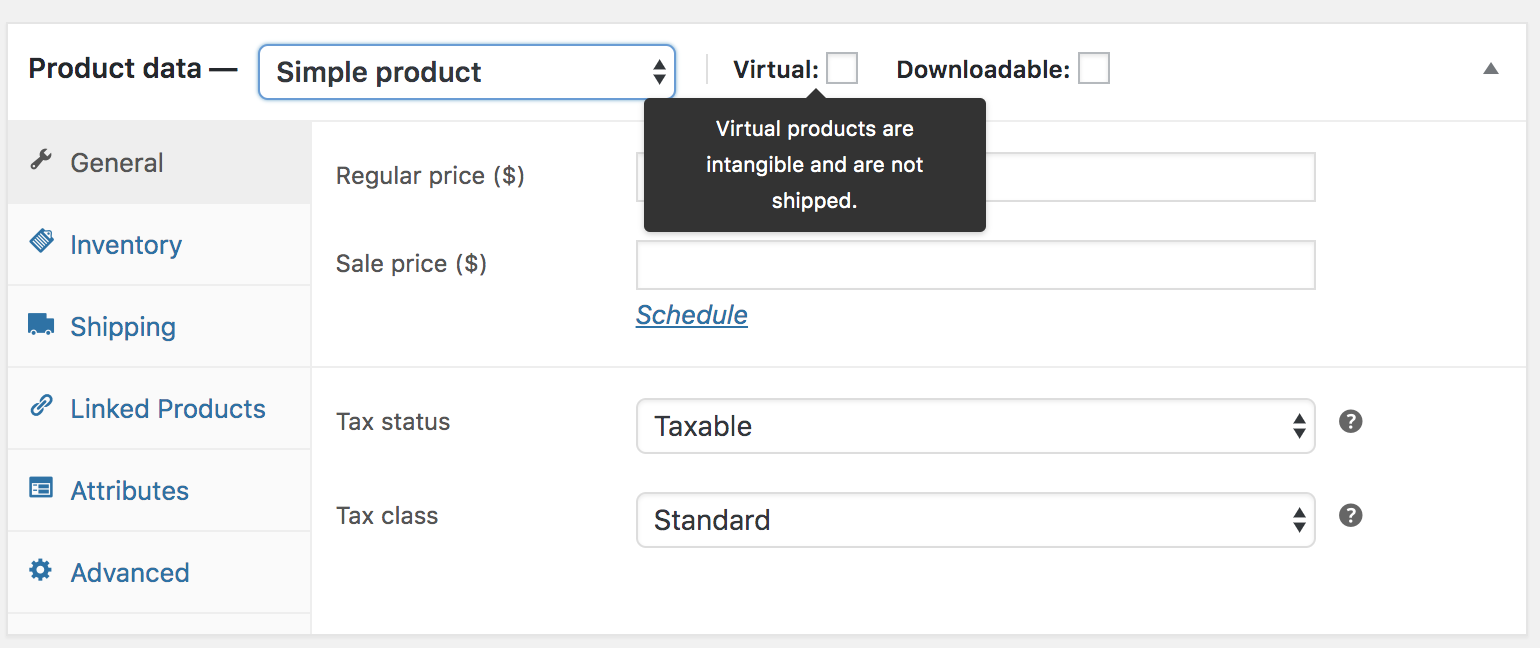
Virtual – one that doesn’t require shipping. For example, a service. Enabling this, disables all shipping related fields such as shipping dimensions. A virtual product will also not trigger the shipping calculator in cart and checkout.
Downloadable – activates additional fields where you can provide a downloadable file. After a successful purchase, customers are given a downloadable file as a link in the order notification email. This is suitable, for example, for a digital album, PDF magazine, or photo.
External or Affiliate – one that you list and describe on your website but is sold elsewhere.
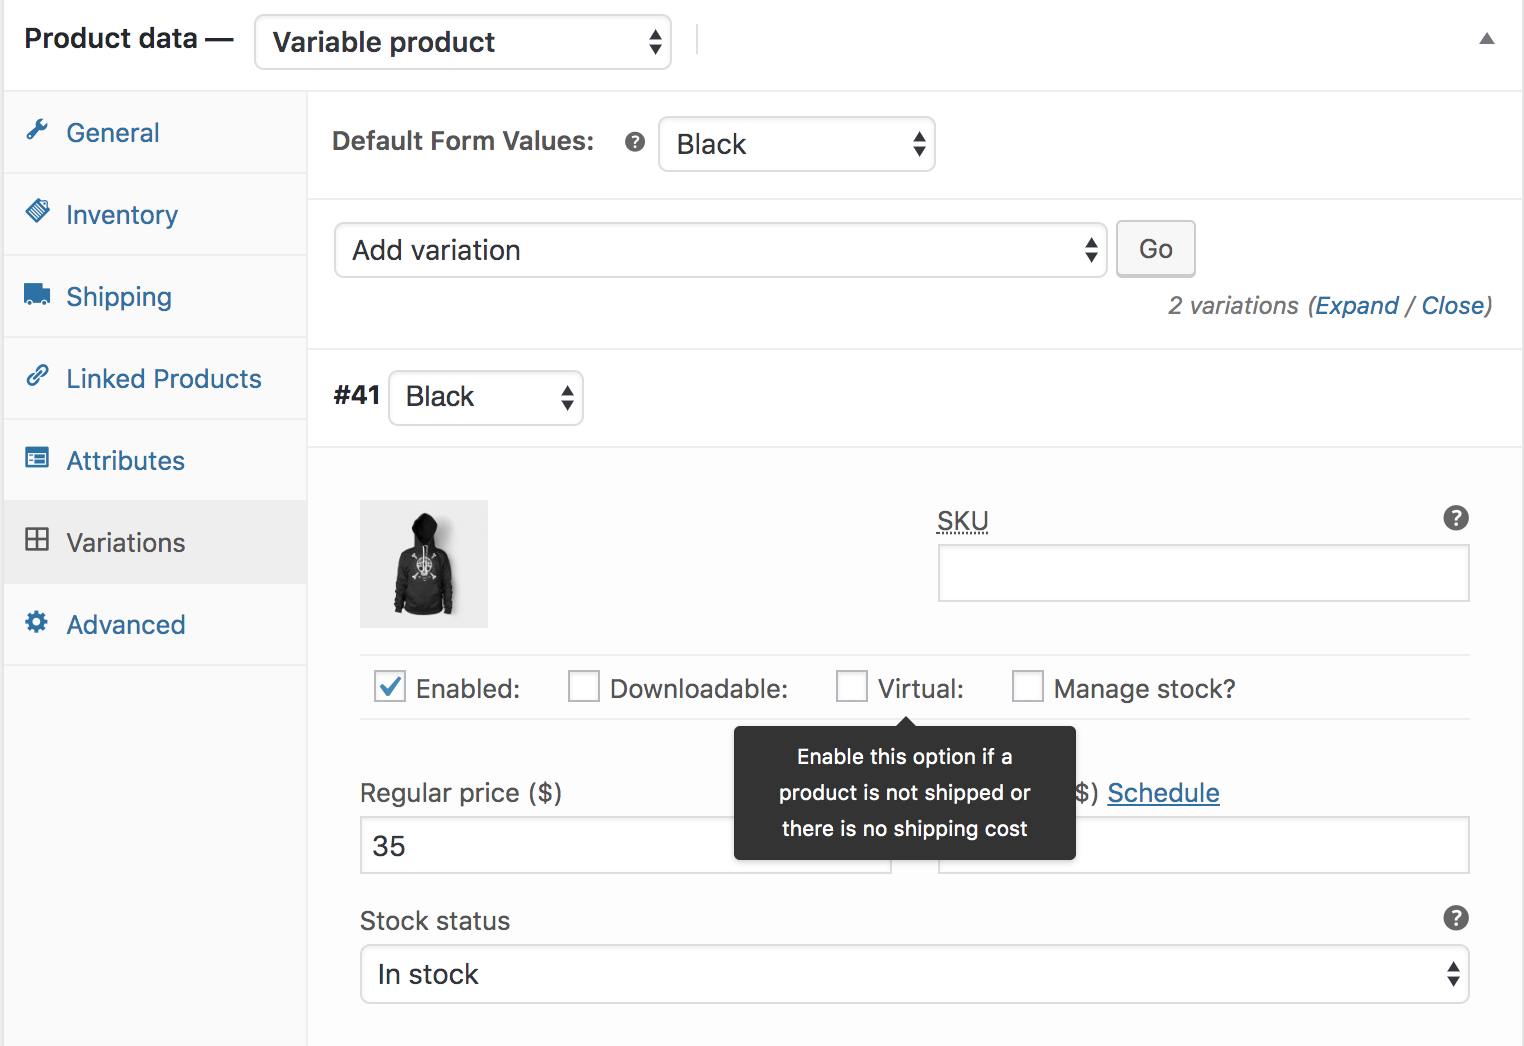
Variable – a product with variations, each of which may have a different SKU, price, stock option, etc. For example, a t-shirt available in different colors and/or sizes.
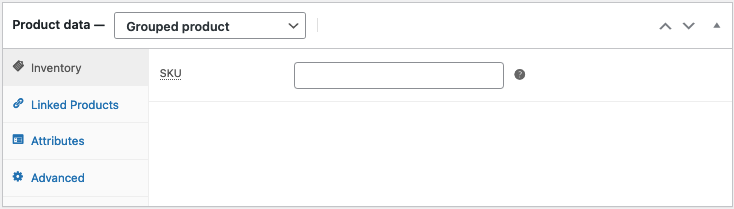
SKU, or Stock Keeping Unit number, is a unique number assigned to a product for, amongst other things, the purpose of keeping track of inventory.
The SKU field can accept up to 255 characters, which can include alphanumeric values and some special characters. The input is checked using the WordPress function santize_text_field, which means HTML, invalid UTF characters, and octets will be removed when saved (an octet is defined by % followed by 2 characters with a value in the range of a-f or 0-9).
Adding a simple product
Adding a Simple product is similar to writing a post in WordPress.
Go to WooCommerce > Products > Add Product. You then have a familiar interface and should immediately feel at home.
Enter a product Title and Description.
Go to the Product Data panel, and select downloadable (digital) or virtual (service) if applicable.
Note: Virtual products don’t require shipping — an order with virtual products won’t calculate shipping costs.
Product data
The Product Data meta box is where the majority of important data is added for your products.
General section
Price
Regular Price – Item’s normal/regular price
Sale Price – Item’s discounted price that can then be scheduled for certain date ranges. The sale expires at 11:59pm of the specified end date
Tax
Tax status – Taxable / Shipping only / None
Tax class – Choose which tax class should be applied
Inventory section
The inventory section allows you to manage stock for the product individually and define whether to allow back orders and more. It enables you to sell products and allow customers to add them to the cart to buy.
Enable Stock Management must be selected in Products Inventory Settings; otherwise, only the ‘Stock status’ option is visible in the Product Data Inventory box.
Options when stock management at product level is disabled. You are responsible for updating the Stock Status.
Options when stock management at product level is enabled.
Enter the Stock Quantity, and WooCommerce auto-manages inventory and auto-updates Stock Status as Stock, Out of Stock or On Backorder.
Select whether to Allow Backorders.
Low stock threshold – Enter a number upon which you are notified.
Tick the Sold Individually box to limit the product to one per order.
Shipping section
Weight – Weight of the item.
Dimensions – Length, width and height for the item.
Shipping Class – Shipping classes are used by certain shipping methods to group similar products.
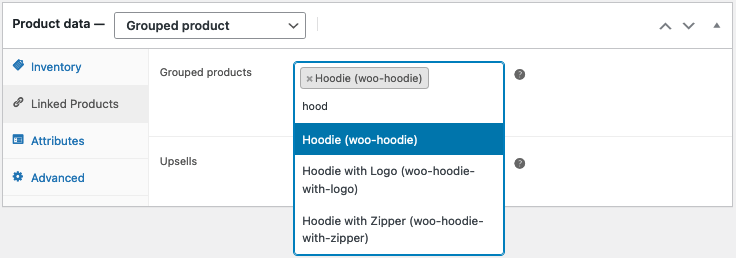
Linked Products section
Using up-sells and cross-sells, you can cross promote your products. They can be added by searching for a particular product and selecting the product from the dropdown list:
Up-sells are displayed on the product details page. These are products that you may wish to encourage users to upgrade, based on the product they are currently viewing. For example, if the user is viewing the coffee product listing page, you may want to display tea kettles on that same page as an up-sell.
Cross-sells are products that are displayed with the cart and related to the user’s cart contents. As an example, if the user adds a Nintendo DS to their cart, you may want to suggest they purchase a spare stylus when they arrive at the cart page.
Grouping – Used to make a product part of a grouped product. More info below at: Grouped Products.
Attributes section
On the Attributes tab, you can assign details to a product. You will see a select box containing global attribute sets you created (e.g., platform).
Once you have chosen an attribute from the select box, click add and apply the terms attached to that attribute (e.g., Nintendo DS) to the product. You can hide the attribute on the frontend by leaving the Visible checkbox unticked.
Custom attributes can also be applied by choosing Custom product attribute from the select box. These are added at the product level and won’t be available in layered navigation or other products.
Advanced section
Purchase note – Enter an optional note to send the customer after they purchase the product.
Menu order – Custom ordering position for this item.
Enable Reviews – Enable/Disable customer reviews for this item.
Product short description
Add an excerpt. This typically appears next to product imagery on the listing page, and the long description appears in the Product Description tab.
Video embeds (oembed) may be used, as of version 3.1x.
Taxonomies
On the right-hand side of the Add New Product panel, there are product categories in which you can place your product, similar to a standard WordPress post. You can also assign product tags in the same way.
Product images
Add a main product image and a gallery of images.
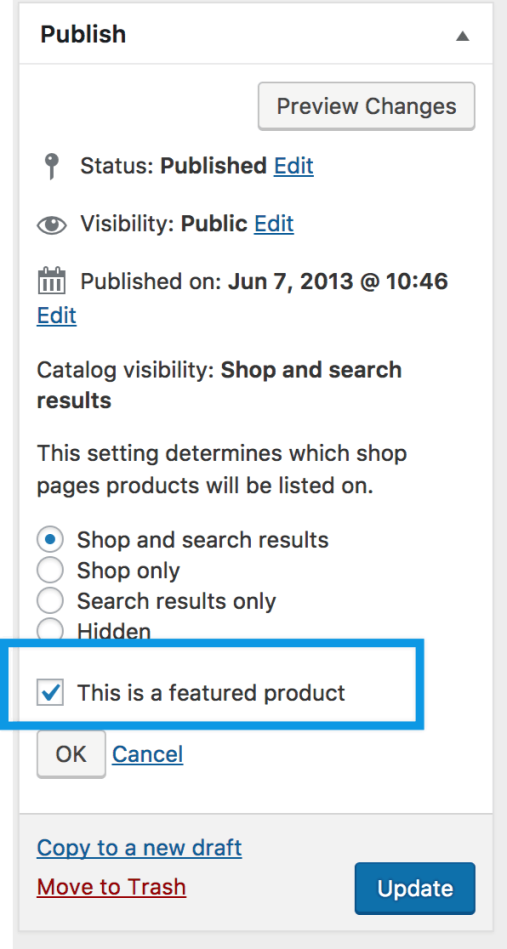
Setting catalog visibility options and feature status
In the Publish panel, you can set Catalog Visibility for your product.
Shop and search – Visible everywhere, shop pages, category pages and search results.
Shop only – Visible in shop pages and category pages, but not search results.
Search only – Visible in search results, but not in the shop page or category pages.
Hidden – Only visible on the single product page – not on any other pages.
You can also set whether the product is promoted in product categories, up-sells, related products as a Featured Product. For example, you could tick the Featured box on all bundles you sell.
Other ways to set as Featured are described in the below section: Mark a product as Featured.
Adding a grouped product
A grouped product is created in much the same way as a Simple product. Grouped products are like lists of other products in your shop, and as a result do not have prices or stock numbers of their own. To create one, select Grouped Product from the Product Type dropdown.
To create your parent product select ‘Grouped’ from the Product Type dropdown.
Create the Grouped product
Go to: WooCommerce > Products > Add New.
Enter a Title for the Grouped product, e.g., Back to School set
Scroll down to Product Data and select Grouped from the dropdown. The price and several other fields disappear. This is normal because a Grouped Product is a collection of ‘child products’, which is where you add this information.
Publish.
The Grouped product is still an empty group. To this Grouped product, you need to:
Create products and add them
Add existing child products
Having the choice to first create Simple products and add them to a Grouped product later; or first create a Grouped product and add Simple products later gives you flexibility to add Simple products to more than one Grouped product.
Add products to the Group
Go to: WooCommerce > Products > Add New.
Select the Grouped product you wish to add products to.
Scroll down to Product Data and go to Linked Products.
Select Grouped Products, and search for the product by typing
Click the products you wish to add.
Update
You can drag and drop to reorder the Grouped Products. Once you press Update, the new order will be shown on the product page.
Adding a virtual product
When adding a Simple product, you can tick the Virtual checkbox box in the product type panel.
With Variable products this checkbox is moved to each variation.
Enabling this, disables all shipping related fields such as shipping dimensions. A virtual product will also not trigger the shipping calculator in cart and checkout.
Adding a downloadable product
When adding a simple product, you can select the Downloadable checkbox box in the product type panel. This adds two new fields:
File path — Path or url to your downloadable file.
Download limit – Limit on number of times the customer can download file. Left blank for unlimited downloads.
For maximum flexibility, downloadable products also incur a shipping cost (if, for example, you were offering both a packaged and a downloadable version of a product, this would be ideal). You can also check the Virtual box if the downloadable product is not shippable.
Web Accessibility for Real Estate Websites: Why It’s Important and How to Achieve It
As more and more people rely on the internet to search for properties, it’s essential for real estate websites to be accessible to all users, including those with disabilities. In this blog post, we’ll explore why web accessibility is important for real estate websites and provide tips on how to achieve it.
Why is web accessibility important for real estate websites?
First and foremost, web accessibility is about providing equal access to information and services to all users, regardless of their abilities. This includes individuals with disabilities, such as visual impairments, hearing impairments, cognitive disabilities, and mobility impairments.
For real estate websites, web accessibility is particularly important because property searches often involve a lot of visual and interactive elements, such as images, maps, and search filters. Without proper accessibility features, users with disabilities may struggle to access and use these features, which can result in frustration and exclusion.
Moreover, web accessibility is not only a moral imperative, but it’s also a legal requirement. In the United States, the Americans with Disabilities Act (ADA) requires businesses and organizations to provide equal access to goods, services, and information to individuals with disabilities. Failure to comply with the ADA can result in costly lawsuits and damage to your brand reputation.
Here are some tips for making your real estate website more accessible:
Provide text alternatives for all images and videos
Images and videos are a crucial part of real estate websites, but they can also be a barrier for users with visual impairments. By providing text alternatives (such as alt text and captions) for all images and videos, you can ensure that users with disabilities can understand and access your content.
Use clear and consistent headings and labels
Clear and consistent headings and labels can help users with cognitive disabilities and screen readers navigate your website more easily. Use headings to organize your content, and make sure that labels for form fields and buttons are descriptive and easy to understand.
Ensure that your website is keyboard accessible
Many users with mobility impairments rely on keyboard navigation to access websites. Make sure that all interactive elements on your website (such as menus, forms, and buttons) can be accessed and activated using a keyboard.
Use color and contrast effectively
Color and contrast can help users with visual impairments distinguish between different elements on your website. Make sure that text is easy to read by using high contrast between the text and background colors.
Test your website with accessibility tools and users with disabilities
Finally, it’s important to test your website with accessibility tools and users with disabilities to ensure that it’s truly accessible. Use accessibility checkers like WAVE or Axe to identify and fix any accessibility issues, and consider conducting user testing with individuals with disabilities to get feedback on your website’s accessibility.
In conclusion, web accessibility is essential for real estate websites to ensure equal access to all users and comply with legal requirements. By following these tips, you can make your website more accessible and inclusive for all users.